Category Archives: blog

root folder for blog posts

President’s Challenge: Hole

The requirements for my woodturning club’s next president’s challenge is pretty simple: Put a hole in a perfectly good bowl. There were some subtleties, like no filling the hole and natural holes don’t count, but there wasn’t any restriction on how the holes were made and nothing that said there could only be ONE hole. Since I’ve been taking a more active role in the club, I kinda feel some pressure to do something creative and not just phone it in, so I started thinking about what was possible.

I thought about drilling a bunch of randon holes in the blank, then watch as they changed shapes as the bowl was turned. That didn’t seem like a very “controlled” project and it could easily end up looking really bad. I thought about making another birdhouse, since the hole for the birds to use would qualify for the challenge. That seemed like “same old same old”, didn’t feel fun, and the thought only lasted a few seconds. I thought about doing some kind of resin project, since I hadn’t done one of those in awhile. There really wouldn’t be any point to using resin, since the whole point was adding a hole in whatever gets made. I thought about making a clock and then drilling holes where the hour markers would be, since that would be something I haven’t made before. That seemed like a “someday” project, because I don’t currently have the clockworks that would be needed and I’m most likely going to do something with segmenting and resin inlays when I get around to making myself a clock. I thought about making a wizard’s pipe, but I’m sure the molds for bending the stem didn’t make the move. I thought about making a kids toy of some kind like a whistle or ring stacking thingy, but decided that would just open up a fight between the kids over which grand baby got to have it. I even thought about making a bucket with a hole in it, but didn’t want that stupid song running through my head.

I finally decided on doing some kind of piercing project. The gist of a piercing project is to turn something very thin, then take a power carving tool and make little holes in the project, aka piercing the wood. It can be a bowl, a vase, a goblet, pretty much anything. Some people do really elaborate patterns, some only pierce the wood on part of the project, and some people seem to see just how much wood they can remove, making the final project extremely fragile. Since all I have to use for the piercing (for now) is a cordless Dremel, I decided to go a little smaller scale and pierce an accent ring around a bowl.

The wood is cherry, and was a roughed out bowl blank given to me by another club member when I bought some equipment from him. (THANKS, Terry!) Since it was already rough turned, the basic shape of the bowl was set. Initially, I didn’t want the entire bowl to be thin, so I only thinned part of the bowl (from both the inside and outside) of where I wanted the piercing to go. The only bits I had to use were cheap “diamond” bits, but they were never really intended to do this kind of work, or this extensive of work. They got so hot they burnt the wood and ended up breaking down (I think there were four bits ruined by the time the piercing was done). The up side is the burning from the bits actually burned the inside of the holes, making the piercing stand out more because of the black that was left.

After the piercing was done, I put it back on the lathe to refine the outside shape, finish turning the bottom of the bowl, sand, sand more, then hand sand, then sand more, and finally take the tenon off. Below is the end result. I had wanted to use a friction polish, some laquer, then buff the whole thing until is was absolutely smooth, but all of that “stuff” is still packed away and I really don’t feel like digging it out. I settled on several coats of spray lacquer for a finish.

I think I like it, but really wish I would have added some color, if not on the whole bowl, at least on the strip that is pierced.

From the top, I like the way there’s no hard edge between the bowl and the piercings, but there is between the top rim. I’d like to say that was intentional, but it was the inevitable result of all the sanding that had to be done…
From the side, the “depth” of the piercing can be seen. It would have been a LOT easier if I had made that part of the bowl about half as thick, but I was afraid it would become prone to cracking.

President’s challenge – color

The club I’m in has a “president’s challenge” that runs for two months, then a new one starts. The intent is to incent members to create something that’s outside of their comfort zone. For March and April, the challenge is to “color it”, since many of the members only make things that are “brown and round”. The idea is that the finished product shouldn’t have any visible brown wood on it, or very little.

The current president is away from the club for a bit, so I’ve been asked to fill in. I figure if I’m going to be the acting president, I should be participating in the challenges. Not having a shop is a serious obstacle toward making things, but there are ways around everything. When I bought my new lather (which is my “forever lathe”, meaning I will never have to buy another lathe, since this one will do everything I can imagine doing) the guy I got it from threw in a couple of bowl blanks. One had a distinctive grain pattern that I thought was sycamore, but found out later it was elm. Thanks (again) to Bob, my friend and mentor, the bowl blank was quickly finished into a simple bowl. The inside of the bowl had a very distinctive grain pattern, but the outside wasn’t nearly as striking.

For the inside, I used a blue aniline dye to meet the challenge requirements. The bad thing about dying wood, is any blemish in the wood, be it tool marks or sanding marks, will be accentuated. EVERY mistake I had made in turning was now a glaring error. I had to re-sand all of the bad spots, then apply another coat of dye.

For the outside, I started applying the blue aniline dye, but quickly quit because it looked horrible. The end grain portion looked almost black, and the side grain didn’t take the stain very well at all, making it look like there was a vertical stripe on the outside. NOT the look I was going for. To cover the mistake, the only solution was paint. I decided to do the water marbling (aka hydro dipping) technique with silver and gold metallic spray paint, but control things so that none of the paint got on the inside of the bowl. The paint, however, decided that it was going to do whatever it wanted! I’d also forgotten that metallic paint doesn’t act the same as regular enamel spray paint and can get pretty clumpy. When I dipped it, I was left with a real clumpy finish and big globs of paint that had floated into the inside of the bowl. Great! More sanding! Mostly out of frustration, I decided to dip it again, only this time encourage it to be as gloppy as possible. When it came out of the water, the outside was covered with globs of paint that looked like snot. I patted it down with a wet paper towel, which left a textured finish, which I kinda liked.

More sanding on the inside to remove the wayward globs, then more dying to even out the newly sanded parts, and more turning to remove the tenon from the bottom. This is what I came up with. Not sure if I love it or hate it, but at least I have an entry in the challenge completed. Please forgive the low quality pictures, I’m still working on that…

I LOVE the grain pattern that came out on the inside of the bowl. Very distinctive lines!
In natural light, the gold and silver are a LOT more shiny. I like the texture, but not real wild about the overall look.

So… Now, I’m a teacher?

Hindsight is a wonderful thing, because most of the time you never see change coming. . Sometimes it just kings leans on you and curves the trajectory you were on, sometimes it sneaks up in your blind spot and pushes hard, and sometimes it’ll walk right straight at you and punches you in the gut. No matter how it happens, or how long it takes to fully run it’s course, it’s only when you look back that you can see just how different things have become. Woodturning is a good example. The oldest bowl I have from when I started turning (excluding the one piece I made in High School) is dated 2009. That means I’ve been at this for about ten years now. Really? Ten years? It doesn’t seem like that long ago.

When I first started, I made a lot of really bad stuff. I didn’t know it at the time, but in hindsight, there were some really hideous projects: bowls that looked like dog food dishes, vases that had the ugliest shape imaginable, and projects so bad I eventually burnt them in the firepit. Funny thing is, I can remember making them and thinking at the time what a good job I had done. I know that I’ve continued to learn, that my skills have improved over time, and that there is a cumulative (positive) impact that comes from time spent standing in front of a lathe – BUT – I still see myself as an “ok” woodturner at best.

Fast forward to now and somehow I’m an officer in my wood turning club. Wait, what? Don’t you actually have to know what you’re doing first? I was at an officer’s meeting where I was harping about the need to make the club more accessible to new turners and suggested the club needed to do more to attract and retain new, younger, turners. I threw out the idea of creating a training class, targeting people who had just started turning, or had a strong desire to learn, with a secret expectation that someone who actually had skills would pick up the idea and run with it. Everyone agreed with the concept, but no one raised their hand.  Next thing I hear is my voice saying, “I’ll do the class”.

Wait! What did I just say??? They all agreed, ensuring that the village idiot was going on the stage.

The next day I was looking at a blank PowerPoint presentation, trying to figure out what the hell I was thinking in trying to pass myself off as some kind of “teacher”. Me. The idiot. The guy who’s marginal at best. The guy who’s only been turning for 10 years. The guy who still forgets to tighten the tailstock before cranking up the speed on the lathe. What makes me think I know enough to teach? The empty powerpoint just sat there, mocking me.

I took a break and decided to switch tactics. Rather than make one Powerpoint with whatever “wisdom” I had, I decided to make an outline of all the stuff I remembered having to learn back in 2009, then I could group the information into modules and work on just one topic at a time. I figured if I took an honest stab at the initial creation, I could get the guys from the club who were actually competent to help fill in the (many) blanks. That didn’t seem quite so daunting. 7 modules later, I sent the material to some much more experienced turners in the club for review, sat back, and waited for my work to be shredded. It didn’t take long. Very quickly, the responses came back, but all they came back with were minor edits, most likely caused by the English curriculum of my Heyworth public education. Not what I had expected. It made me realize a few things. I must have done a better job than I expected in grouping the information into logical chunks, since there was no feedback concerning the “flow” of the information I was going to present. There was very little feedback about stuff that was missing, so I must have a more comprehensive understanding of the craft than I thought. While I had braced myself for a steady stream of “you should add something on _____”, it never came. That was when I realized that I may not be an “expert”, but somewhere along the line I’ve learned enough to be able to offer a pretty strong overview on how to get started.

I put a blurb out on the club’s public Facebook group (which is open to the public) and was absolutely stunned when 7 people (6 of whom were not already club members) were willing to join the club just to take the class. This is exactly what I had hoped for when I was harping at the officer’s meeting, but it suddenly became “put up or shut up time”.

This class was this past weekend. We started at 9:00, right on time, and the agenda was roughly “I’ll babble on for a couple of hours, break for lunch, do some hands on stuff, and be home by dinner”. That was the plan, anyway, but the only part that held was that we started right on time at 9:00. I was still reviewing slides when we broke for lunch because there was a LOT more discussion than I had anticipated, and we didn’t even get started on the hands on part until well in the afternoon. We finally stopped turning at around 6:30, and I suspect there were a couple students who would have been ok with starting something else about then and continuing to turn.

Yes, it took many hours to get the content for the class created. Yes, it took several hours to pack up all the stuff that I needed to take for the class. Yes, it took several hours to get the room “ready” for the class. Yes, it was a very long day spend standing. BUT… it was absolutely worth it! Initial feedback from those who attended support that the class is going to be seen as a total success. The question from the students wasn’t, “why did you waste my time”, it was “when are we doing this again and how to I get signed up!”

Now, looking back at the journey – from turning a simple bowl with my mentor looking over my shoulder and guiding my efforts, to standing in front of a group of people who believed what I was telling them – it turns out I can add “teacher” to my resume. Who woulda thunk it?

It seems change isn’t always a bad thing!

Quilling and turning

The new shop isn’t finished, yet, but that hasn’t stopped me from thinking of projects. (I didn’t realized how much I missed the ability to just play around in the shop until there was no shop to play around in!) I was on the computer one night, deep in the black hole of time suck that is Youtube, and eating a piece of candy. As I watched the video, I was absent mindedly rolling the wrapper around in my fingers until it wouldn’t go any tighter, then rolling it the other way to straighten it out. At one point I stopped half way and looked down at the paper. what I saw, was two spirals, going opposite directions. I tore the paper in half and tried to see if I could make another. Eventually, the paper got smaller and smaller, but I had several nearly identical curly-cues. I figured I wasn’t the first one to roll paper into shapes, so I started looking on YouTube.

Turns out, there’s a whole art form of doing this called “quilling”. Who knew? About 75% of the videos I saw were from people I’m guessing were of Indian or middle eastern descent and the other 25% were soccer moms who seemed to be a little too cheery to be doing a craft project. All of them made it look like something even a child could do. The next hour was spent looking at examples of projects others had completed and every tutorial I could find on how to make different patterns. Some of them were extremely intricate, some were three dimensional, but to be honest, it looked pretty easy. I thought “I can do this, how hard can it be, it’s just twisting paper”.

The next day, after a quick trip to Hobby Lobby, I sat at the counter, preparing to attack the tiny strips of card stock I’d bought with the special quilling tool and tiny scissors that came with the set. I figured 15 minutes and I’d be staring at a masterpiece. After a half hour or so, I realized a few things. First, every one of those videos were made by a bunch of damned liars! I figure the hosts must have done 30 takes at each piece, then edited out the 29 failures so they could present the one good attempt with their fake smile, silky voice, and claim of grand master status. Bastards! Second, I realized that even if I was able to luck into something that even approached “success”, there was no real application for making this stuff. Seriously, even a bad bowl can hold stuff, but what can you do with even the best quilled paper? I put the stuff away, quietly swore to myself, and decided to wait for another day to do this again.

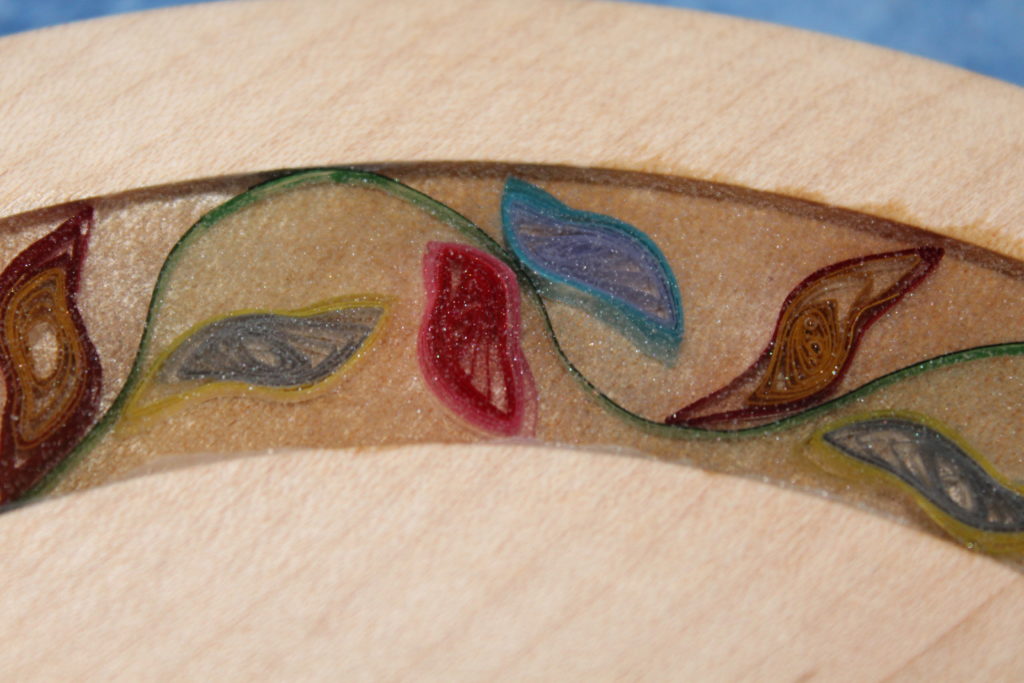
A week or so later, I was at Bob’s house as we started making a wide rimmed bowl out of some old maple boards that I had glued together. The initial intent was to dye the wood and try to do some kind of texturing across the rim, then stack layers of dye and hope to make something worth making. Then it hit me, I could incorporate the quilling into a channel, then set the whole thing in epoxy! I brought the bowl home and set about trying to improve my quilling expertise. After a week or so and many failed attempts, mulligans, and do-overs, I finally arrived at something that I thought looked at least passable.

The finished result is below and for a practice piece, I think it actually turned out ok! The glue job on the maple boards wasn’t the best, so there’s a crack in the piece that I had to “fix” and my sandpaper and supplies for polishing resin are all packed away, so don’t look too close at the top finish. Eventually, I’ll put this back on the lathe, work on the crack a little more, smooth out the resin surface and polish it back down to a glass-like flat surface.

Now, I’m already thinking about the next project, to see if I can do something like this on a wig stand or even an entire bowl made from quilled paper and resin. I have GOT to get my shop back up and running!

Overall, I really like the overall look of the bowl. There’s a crack on the one side where the glue joint partially failed, but other than that, it looks good.
Here’s a close-up of the quilling. There are iridescent flecks in the resin, that I had hoped would catch more light than it actually does, but this will at least show the quilling that was done.

Wendy’s bowl

So…  I started the divorce process in April of 2013 and it’s still going on.  VERY long story there, but the only part I’ll put in this post is that way back when, my attorney made this huge, poured concrete table for the office’s conference room.  He did a really good job, but there was nothing on the table, except for a pile of post it notes and pens.  I told him I’d make him a bowl that would look good and help consolidate the mess.  Well, after the three year mark, he quit practicing law and I got a new attorney from the firm.  After a year or so, the second attorney left the firm to concentrate on appeals, so I got a new attorney from the firm.

Wendy is the newest, and hopefully last, attorney that I should need to finally put a stake through the heart of this beast.  She is an exceptionally nice person and a very good attorney. After a very long meeting with her, going over a whole list of motions that were filed and were to be filed, we were chatting and I mentioned that I still owed them a bowl for the table we were sitting at.  She seemed really excited at the prospect, but since the divorce has caused me to (temporarily) lose my ability to make anything, it was understood that it would still be awhile before I could come through on my much earlier promise.

As I was cleaning out the house to get it ready to put on the market, the shop had to be packed up.  As I was removing things, I found a huge piece of spalted maple that I had been saving for over 9 years.  There were three reasons to hold on to a gorgeous chunk of wood that long.  First, I didn’t have a lathe big enough to spin a piece of timber that big and heavy, so there was a logistical concern.  I also didn’t want to cut it down and make something smaller, because the whole point of keeping a large blank was to make something LARGE!  Second, it had been placed safely under a work table, then several other boxes of supplies and miscellaneous crap had been placed in front of it.  Out of sight, out of mind.  Lastly, since this was my last piece of large spalted maple, and since I already knew the coloration from the fungal zone lines was going to be exceptional, I kinda had this fear that I’d screw it up.  If you don’t start, you may never win, but at least you can’t fail.

Well, as luck would have it, I was able to use the lathe of a very good friend to finally process this piece of timber.  We decided on a traditional bowl shape, keeping it as large as possible and leaving it a little thicker than I normally would have done.  Even with the thickness of the final project, this bowl is surprisingly light.

As I had expected, the coloration in the wood is absolutely gorgeous. I fully intend to keep my word and give it to my attorney, but I will admit it’ll be hard to set it on the table and walk away.  Even harder to continue going there because of the divorce and having to keep walking away…

From the top, the depth and amount of spalting this piece of timber had is amazing. REALLY like the way this one turned out.

From the side, the spalting is equally impressive. Is it just me, or from this angle, is there a grumpy face on the right side of the bowl?